Dairy-free Crème Brûlée
This post may contain affiliate links. As an Amazon Associate I earn from qualifying purchases. For more information, please visit my disclosure page.

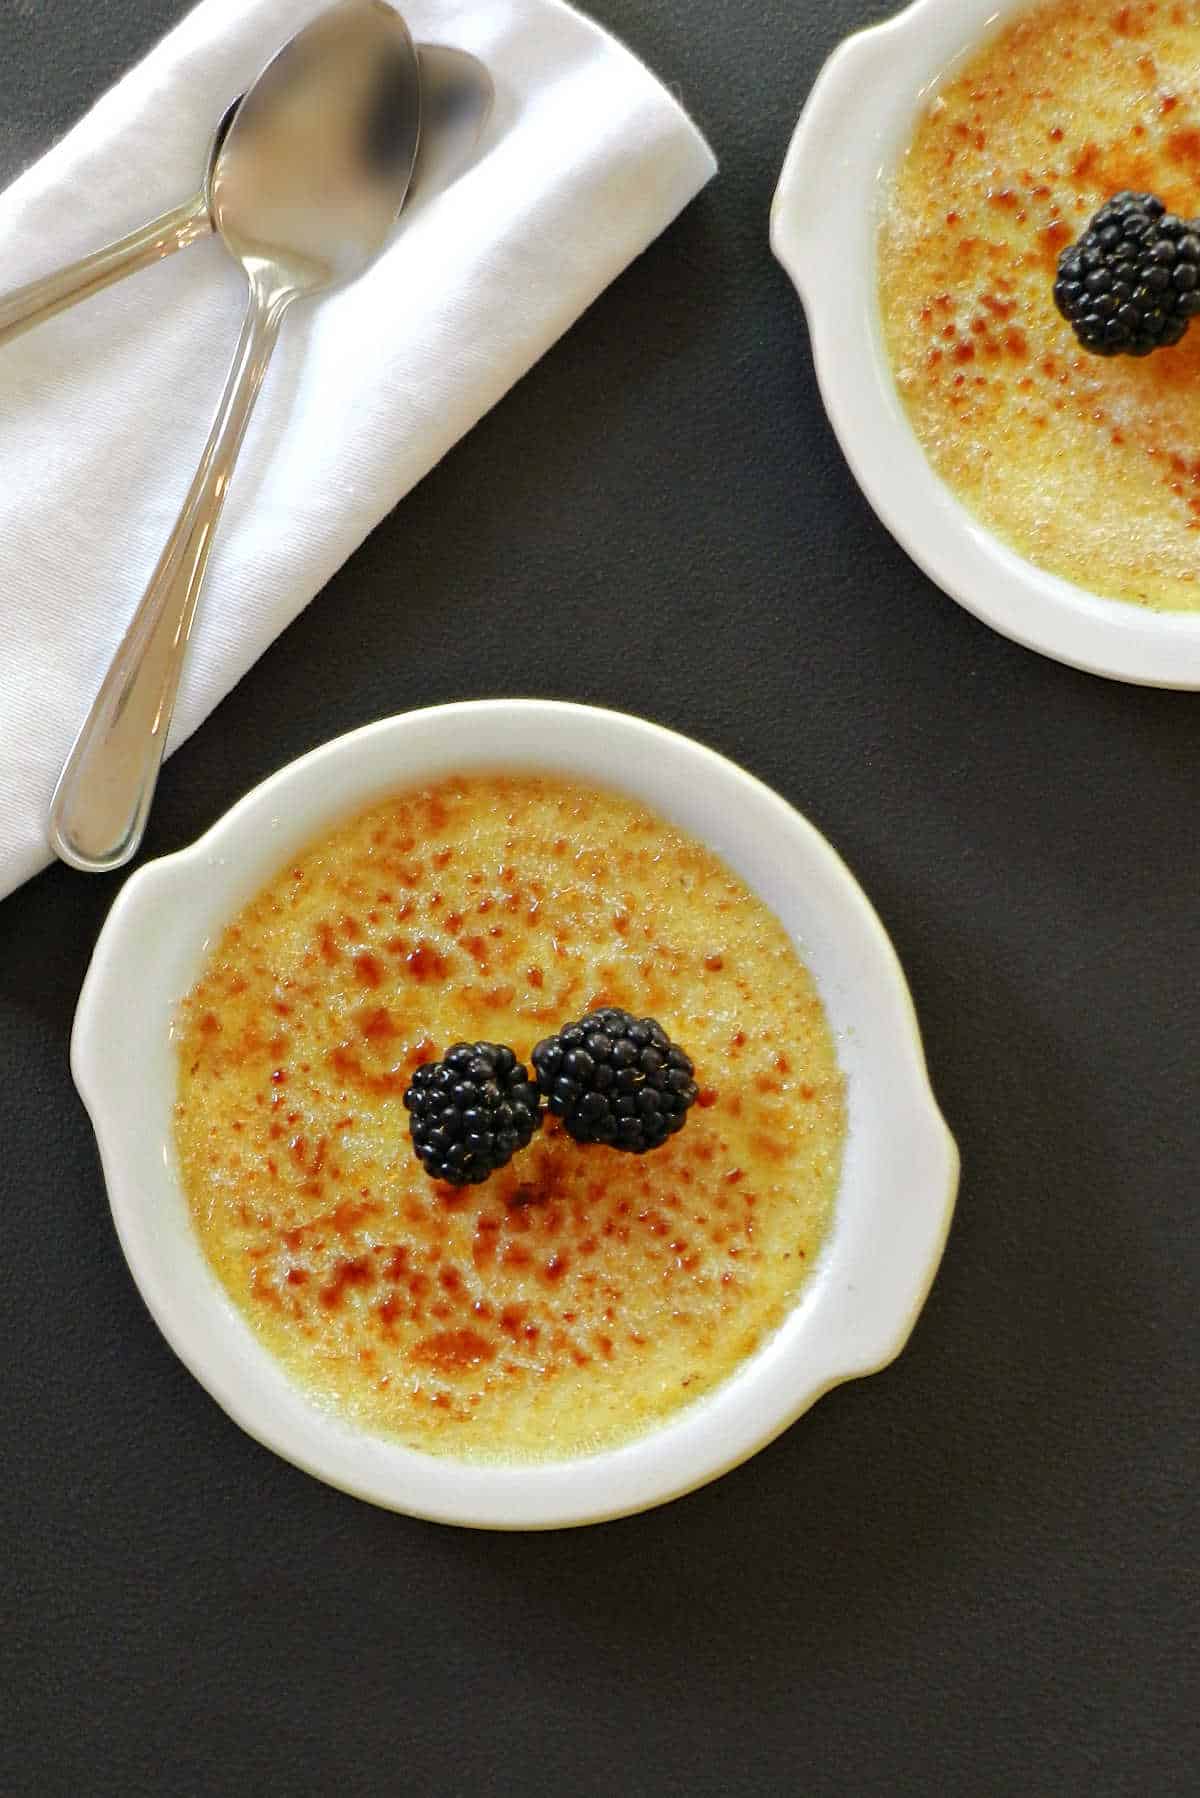
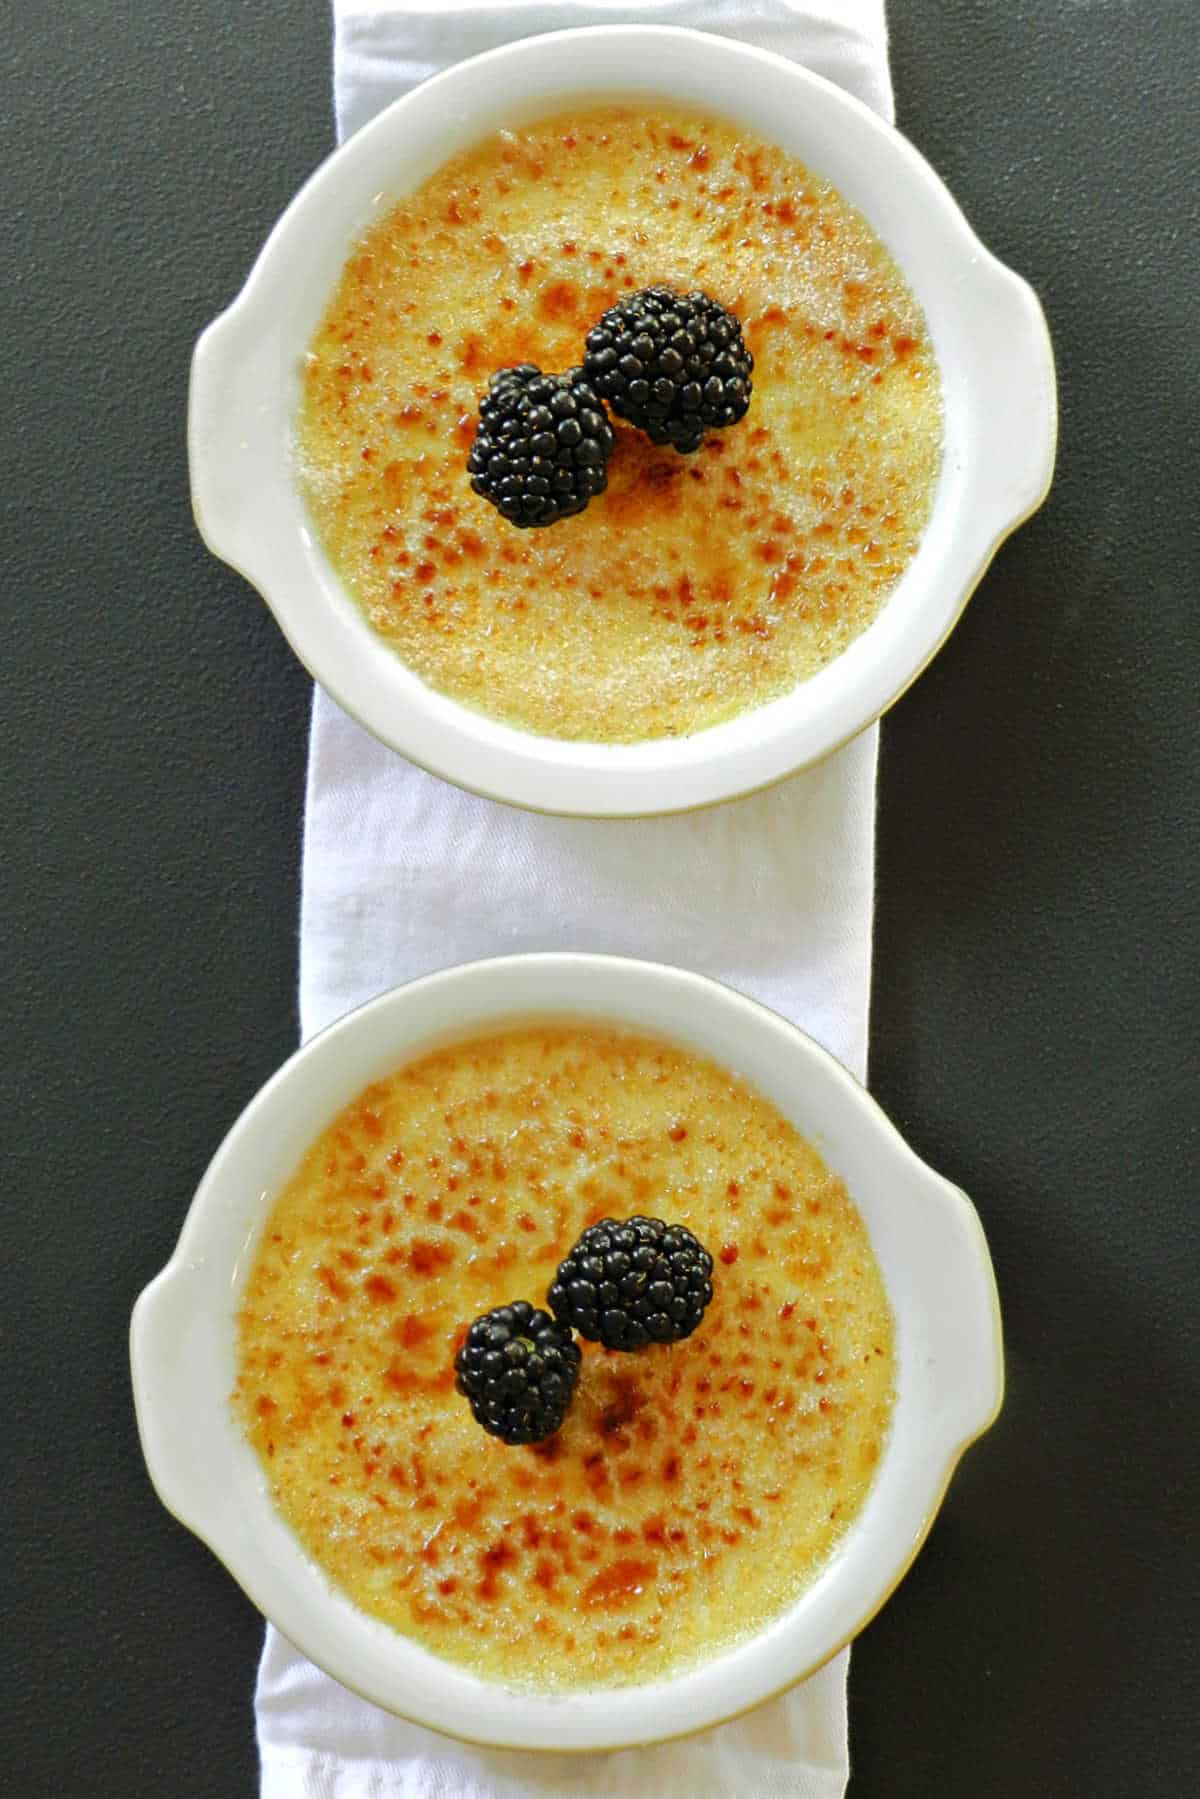
Silky smooth, with a perfectly caramelized sugar crust, dairy-free crème brûlée offers all the decadence of the classic dessert without the lactose. Made with full-fat coconut milk, this creamy treat boasts a rich texture, capturing everything dessert lovers crave in every spoonful.
Whether you’re lactose-intolerant or simply exploring dairy-free alternatives, this timeless indulgence proves that skipping the cream doesn’t mean sacrificing flavor.
The moment that you have all been waiting for, has finally arrived! I wish to present to you…..Dairy-free Creme Brûlée!!! Let’s all pause for a moment.
Okay, for those of you who are not lactose intolerant, this may not be all that exciting. For those of us who drool over the rich, creamy desserts at neighboring tables in restaurants, this is a major accomplishment!
Why You’ll Love This Recipe
- Lactose Intolerance or Dairy Allergy: A dairy-free crème brûlée allows you to enjoy this classic dessert without any adverse reactions if lactose intolerant or have a dairy allergy.
- Canned Coconut Milk: Adds a subtle, sweet, and creamy taste that complements the dessert well.
- Fancy Dessert – Don’t Need A Culinary Degree: Crème brûlée is not necessarily complicated, but it does require attention to detail and patience. It’s a great recipe for home cooks looking to try their hand at a classic, elegant dessert.
You’ll Also Love: Instant Pot Crème Brûlée
Ingredients
- Full-fat Canned Coconut Milk: Its rich fat content closely mimics that of heavy cream, giving the dessert the creamy consistency it needs. The texture is thick, luscious, and velvety, forming the perfect base for the custard. Using canned full-fat coconut milk, rather than a lower-fat or diluted version, is key to achieving that classic silky texture, without the dairy.
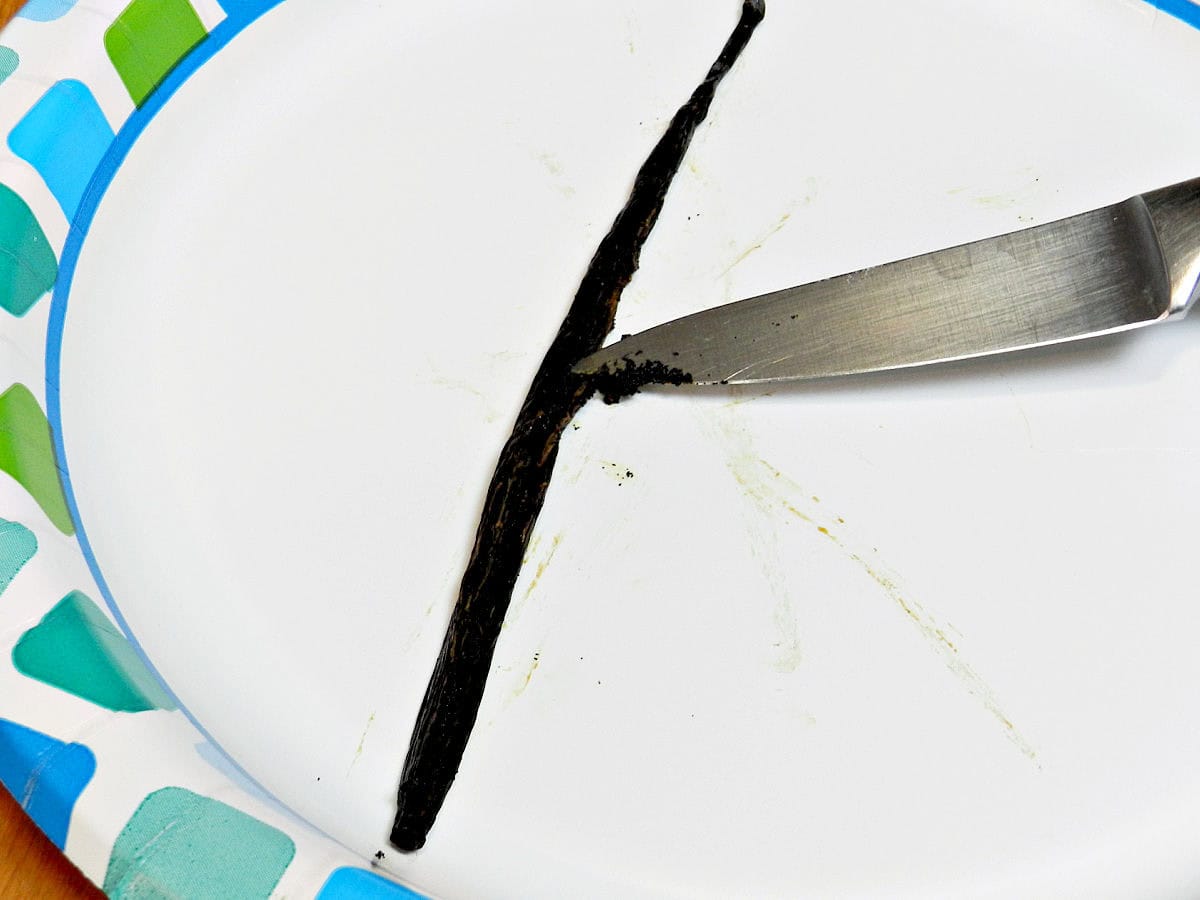
- Vanilla Bean: The little black flecks of vanilla add not only a visual element of elegance but also an unparalleled depth of flavor, that infuses the custard with a warm, aromatic sweetness.
- Eggs and Sugar: The dish is all about the smooth custard base made with egg yolks, sugar, and a creamy liquid. These elements work together to create a silky texture that melts in your mouth.
- Superfine Sugar: Sprinkling granulated sugar atop the chilled custard and using a kitchen torch to melt it into a crackly, golden topping creates pure magic!
Optional garnishes: Fresh berries, mint leaves, or a sprinkle of sea salt can add an extra special touch when serving.
Check out the printable recipe card below for the complete recipe and detailed instructions.
How to Make Crème Brûlée without Dairy
Vanilla Bean Paste
- Simply slice thru the top of the vanilla bean, then use the side of the knife to scrape out the inside. I used everything that I scraped out of one, long vanilla bean to make this recipe. You can substitute 2 teaspoons of pure vanilla extract.
Prepare the Custard Base
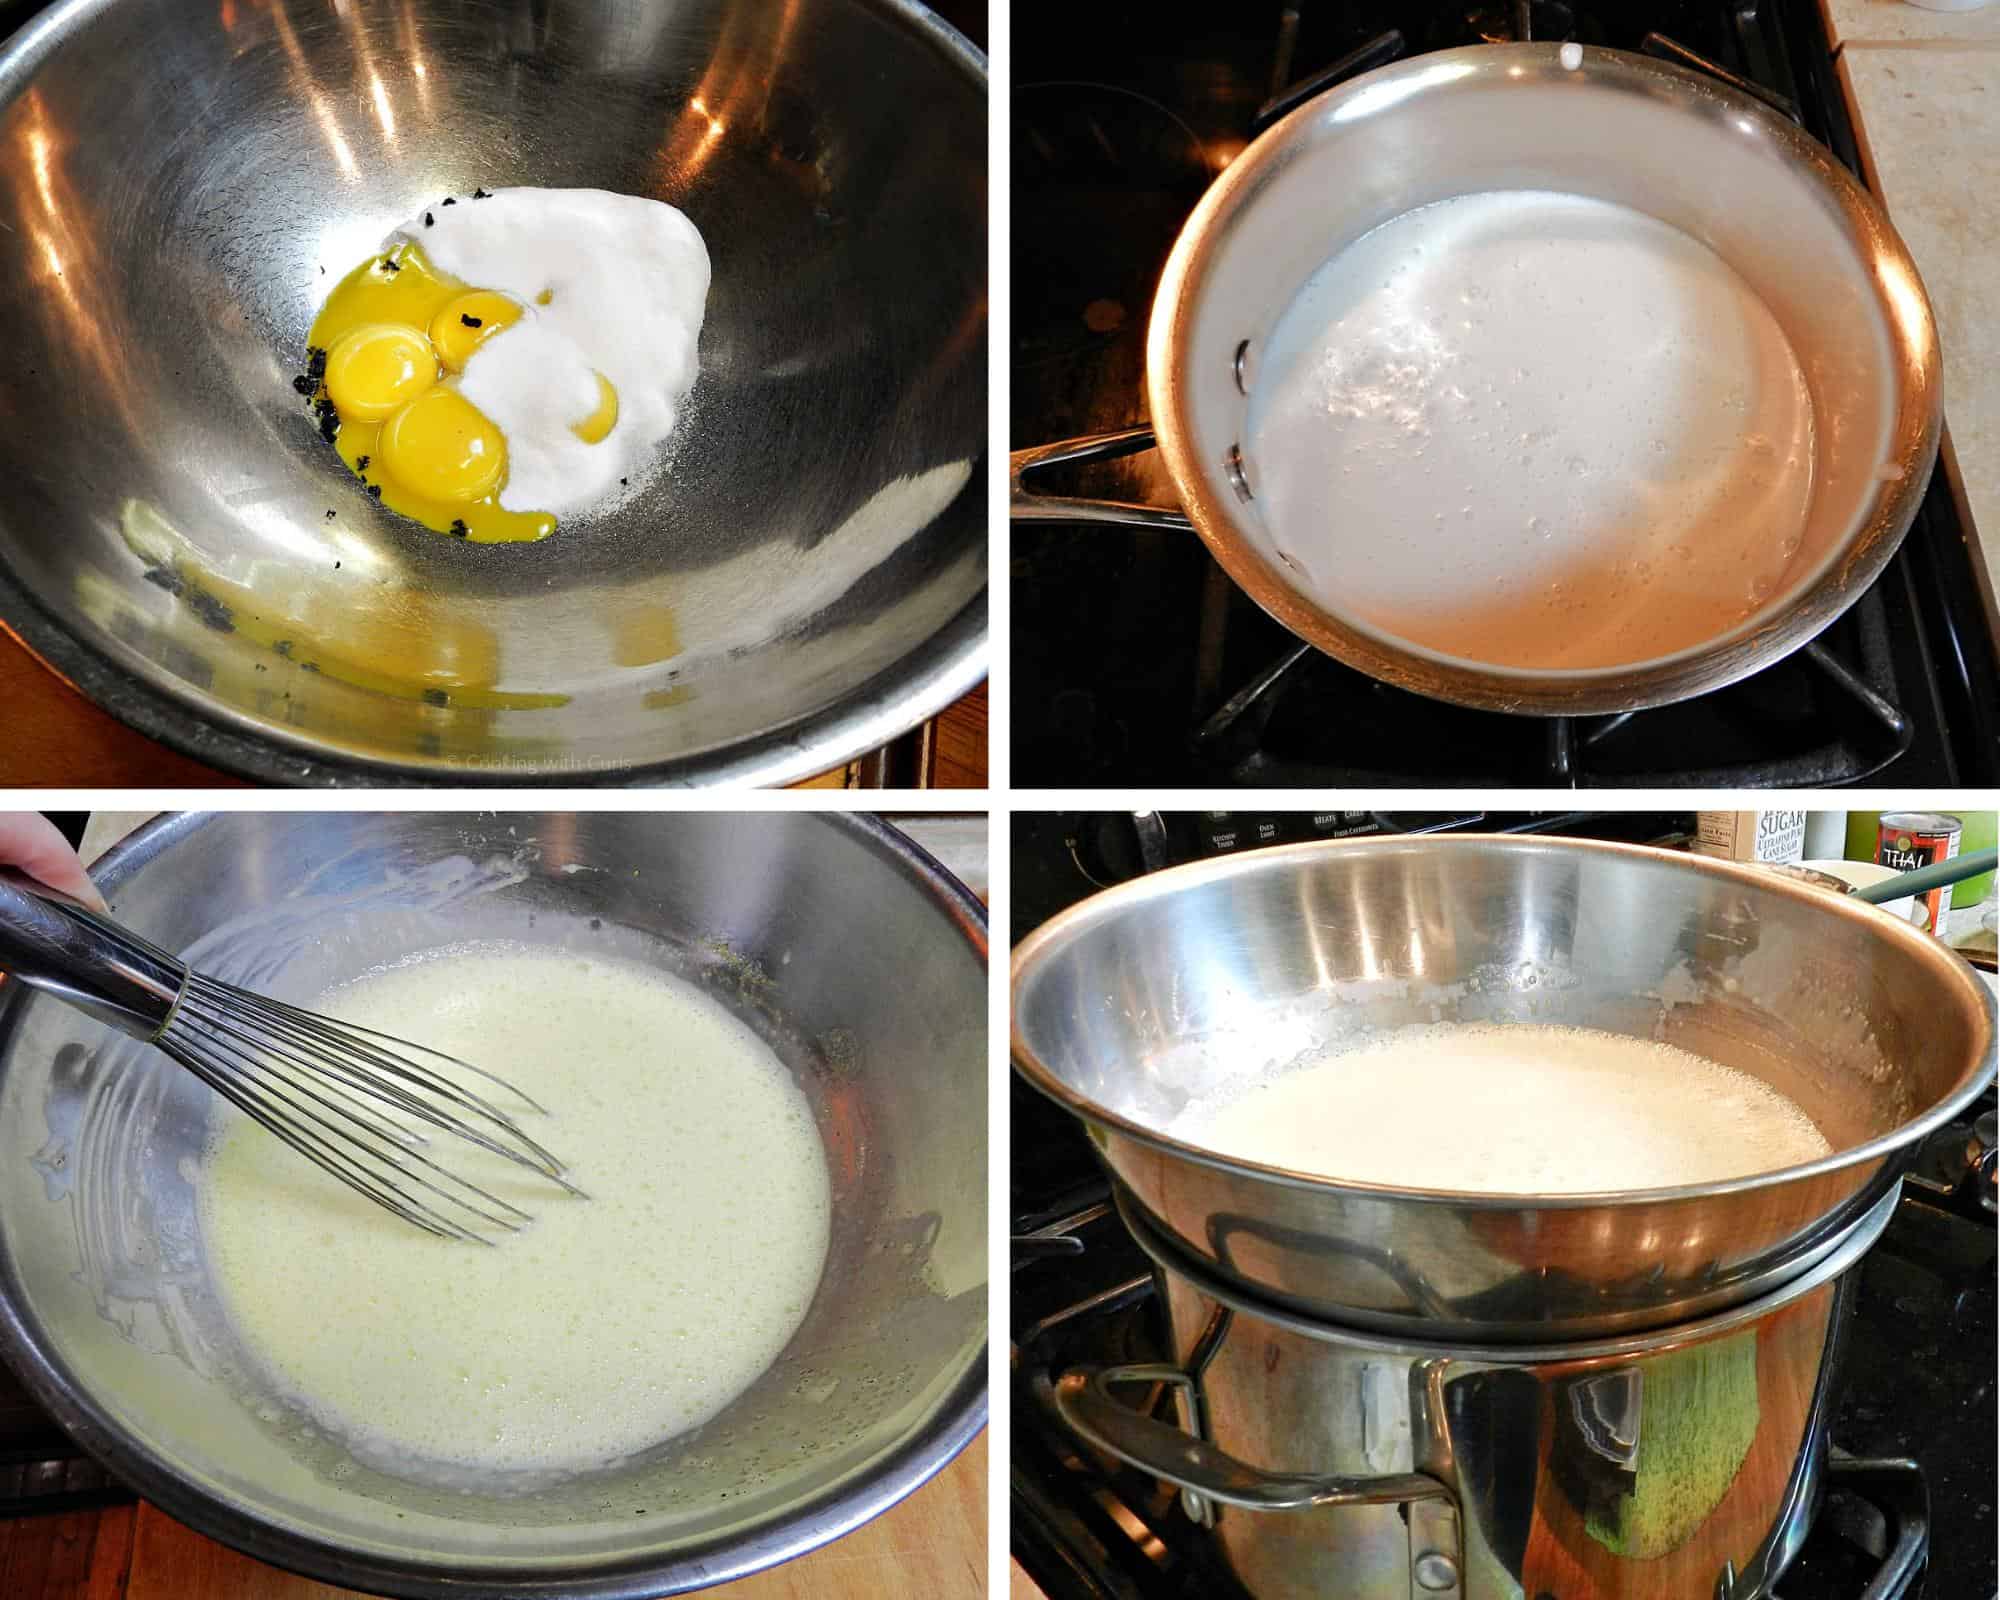
- Heat the coconut milk: Pour the coconut milk into a medium-sized saucepan. Slice open the vanilla bean, scrape out the seeds, and add both the seeds and pod (or vanilla extract, if using) to the milk. Slowly heat the mixture over medium-low heat, stirring occasionally. Keep an eye on it; you want it to steam but never boil.
- Whisk the egg yolks and sugar: In a large mixing bowl, whisk together the egg yolks and sugar until the mixture turns pale and creamy. This step is essential to achieving a smooth texture.
- Temper the egg yolks: Once the coconut milk is warm, slowly ladle small amounts into the egg mixture while whisking constantly. This tempers the eggs, preventing them from scrambling. Gradually incorporate all the warm milk, creating a smooth custard base.
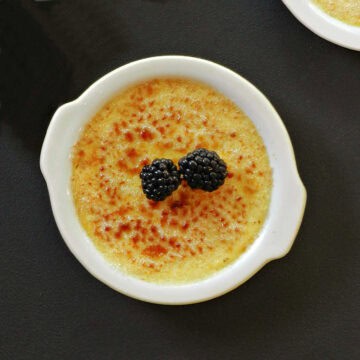
- Cook the custard: Place mixture on top of the pot of boiling water. Reduce heat to simmer, and stir over simmering water until mixture lightly coats the back of a spoon, about 3 to 4 minutes.
Note: Patience is your best friend here. Low heat and constant whisking make all the difference in avoiding curdled custard.
Baking without a Water Bath
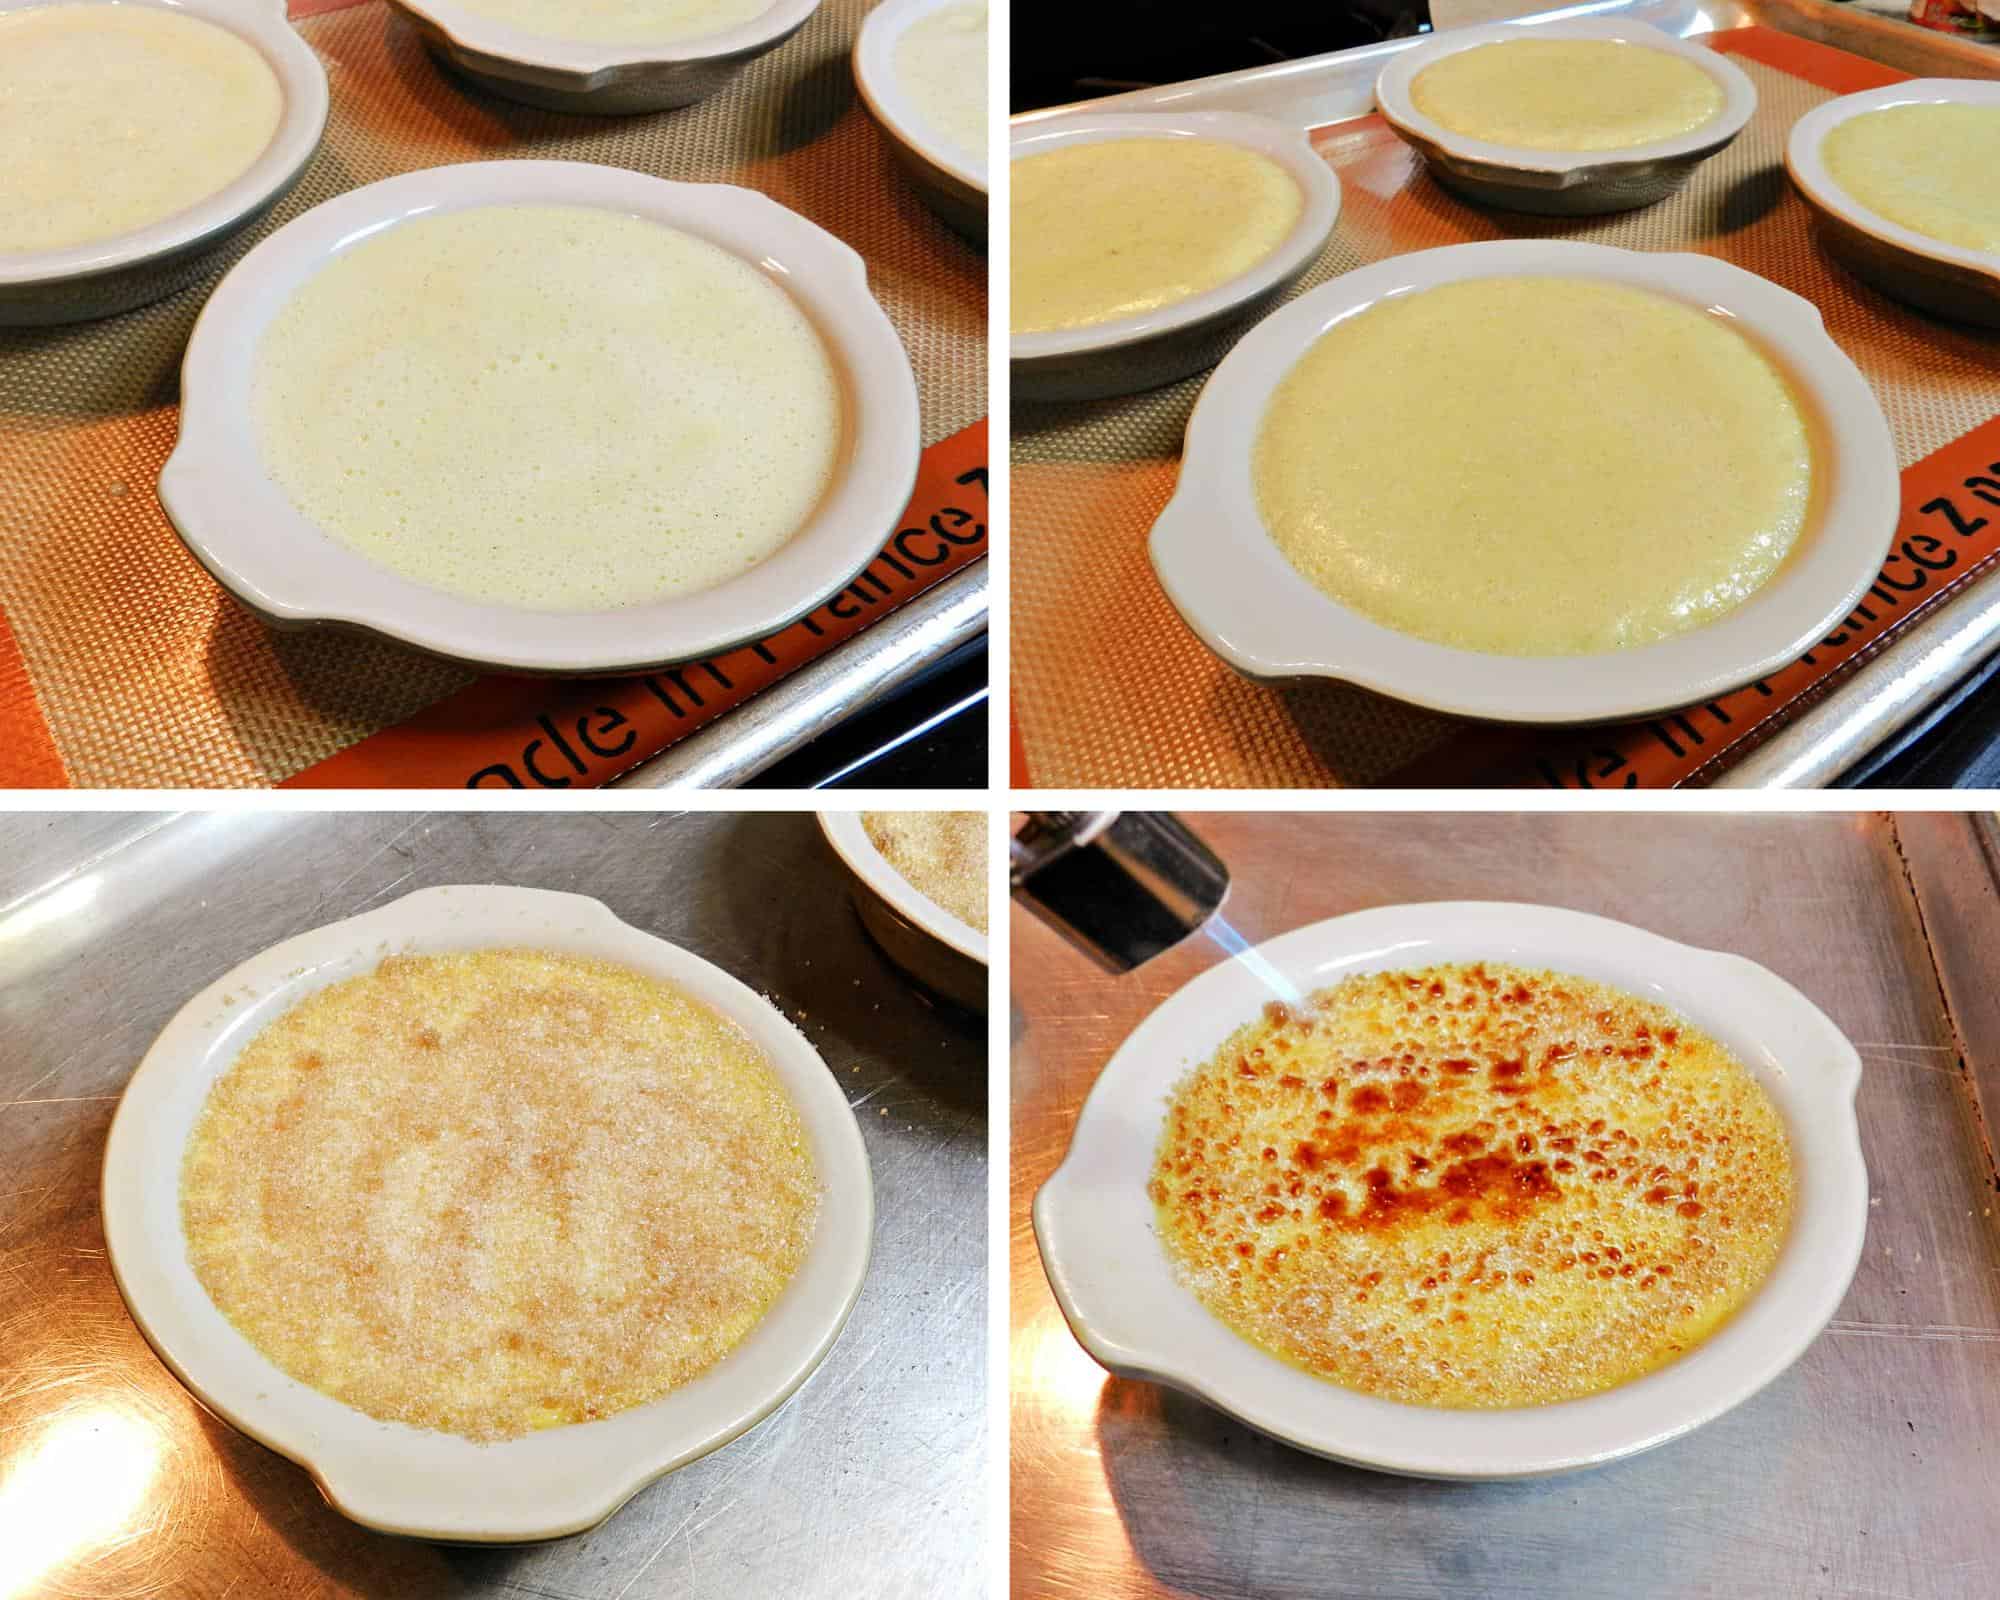
- Pour the custard into ramekins: Divide the prepared custard evenly between 4-6 ramekins, leaving a little space at the top. Place on silicone-lined baking sheet.
- Bake to set: Bake in preheated 300°F. oven for 30 to 40 minutes. You’ll know the custard is ready when it’s set around the edges but still has a slight jiggle in the center.
- Cool and chill: Remove the ramekins from the baking sheet and let them cool to room temperature. Transfer them to the refrigerator for at least 3-4 hours, or overnight if possible. Chilling is key to allowing the custard to firm up properly.
- Sprinkle an even layer of sugar: Once the custard is thoroughly chilled, sprinkle about 1-2 teaspoons of superfine sugar over the surface of each ramekin. Tilt and rotate the ramekin to distribute the sugar evenly.
- Use a kitchen torch: Torch the sugar with steady, circular motions until it melts and turns into a golden, glassy crust. The goal is an even caramelization without burning.
- Alternative method: No torch? No problem. Place the ramekins under your oven’s broiler, about 5-6 inches away from the heat source. Monitor closely, as the caramelization happens quickly, usually in a minute or two. Keep in mind, the broiler can heat the custard slightly, so this method requires careful attention.
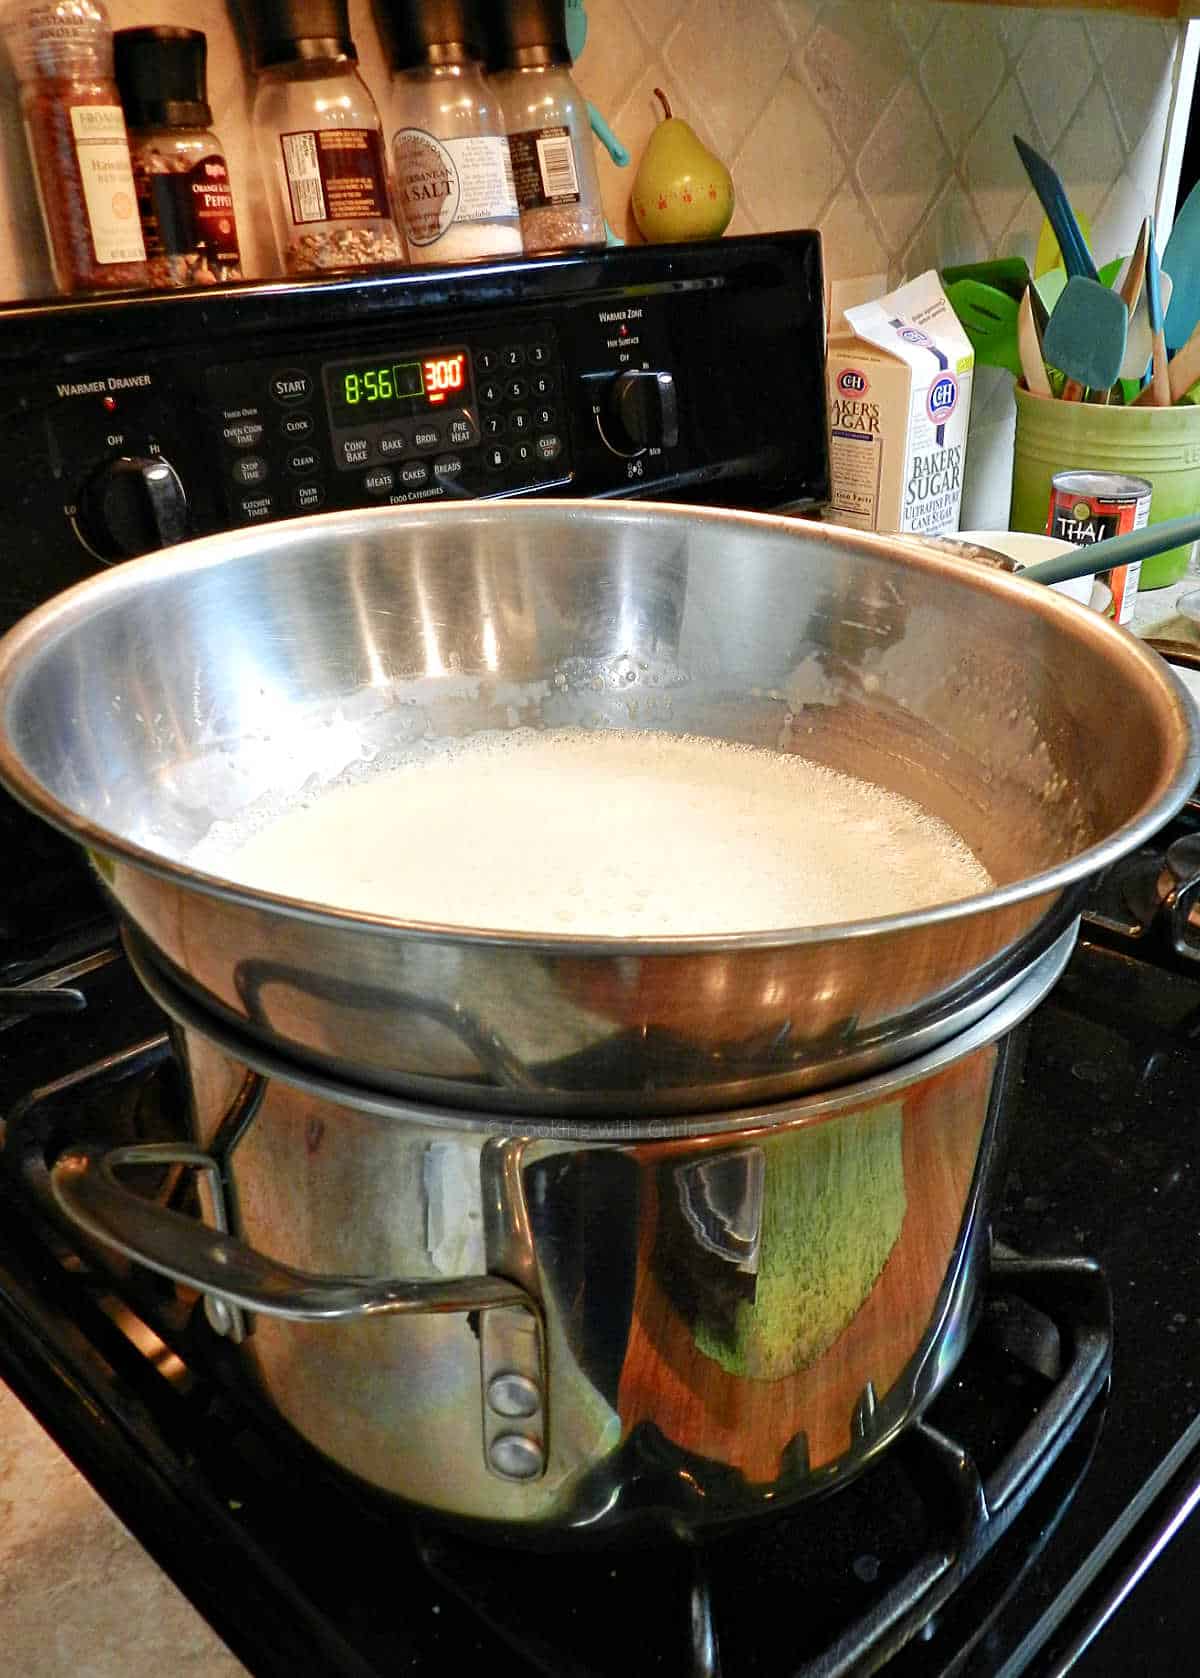
Allow the sugar topping to cool for a minute or two, letting it harden completely. That satisfying tap as you break through the crust and the creamy custard underneath? Perfection!
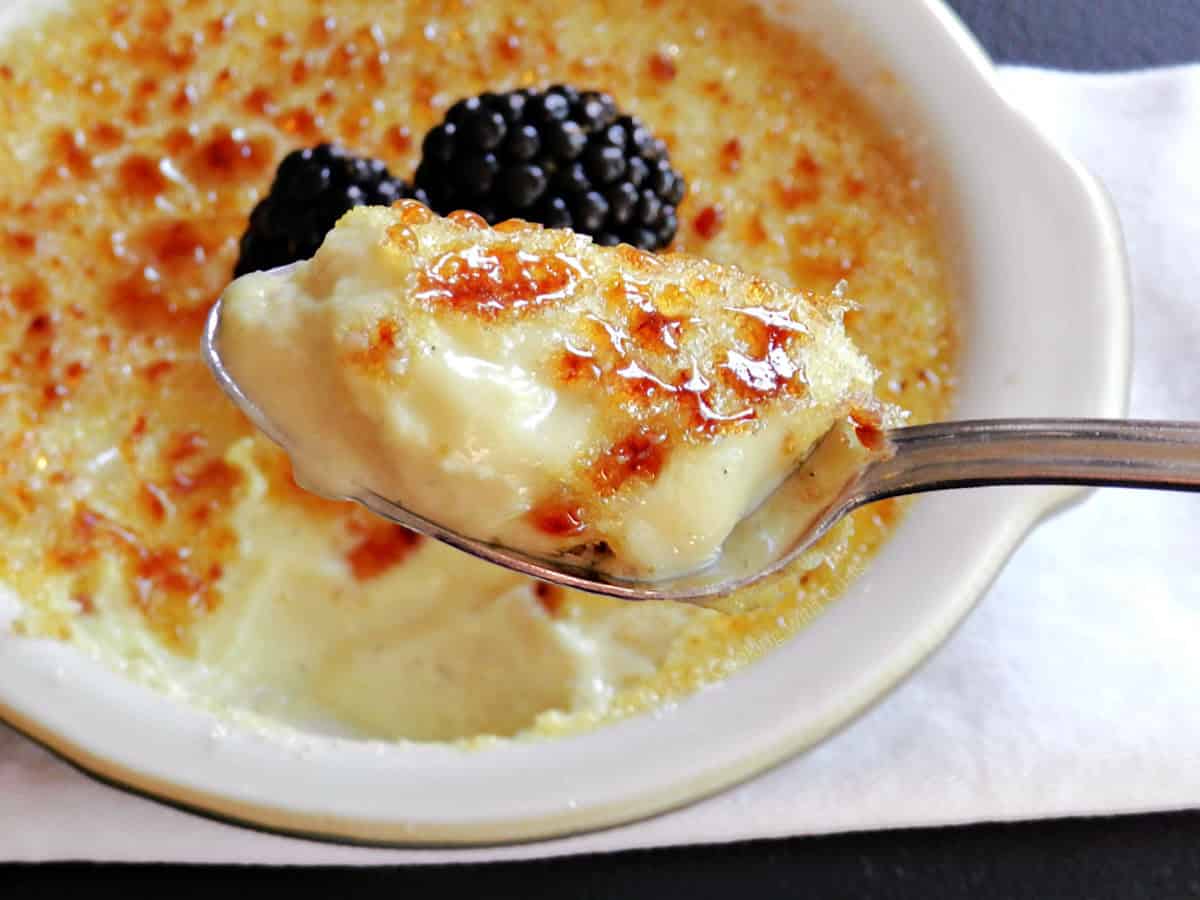
This picture was taken about 5 minutes after I melted the sugar, so it looks a bit soft. If you place it back in the refrigerator and allow it to cool back down, it is just as thick and luscious as the traditional dessert!
You’ll Also Love: Panna Cotta Infused with Dragon Fruit
Tips
- Use full-fat coconut milk: Not all coconut milk is created equal. Opt for canned, full-fat varieties rather than lite or boxed coconut milk. The higher fat content mimics the richness of heavy cream and ensures your custard base is velvety smooth.
- Avoid curdling: The main hurdle when working with egg yolks and coconut milk is curdling, which can leave you with a lumpy texture.
- Temper the eggs by adding the warm coconut milk gradually while whisking constantly. Adding the hot liquid too quickly can scramble the eggs.
- Never let the coconut milk boil; heating it gently is essential for maintaining a consistent, creamy mixture.
- Choose the right sugar: Superfine or caster sugar is the top choice for caramelization. Its smaller granules melt more evenly, preventing pockets of burnt sugar.
- Distribute sugar evenly: Sprinkle 1-2 teaspoons of sugar over each ramekin and tilt it gently to spread the sugar in a thin, even layer. Uneven sugar can lead to inconsistent caramelization.
- Torch like a pro: When using a kitchen torch, work in a steady, circular motion, keeping the flame just above the surface. Gradually melt the sugar until it turns a deep amber color and forms a glassy crust. Avoid lingering too long in one spot to prevent scorching.
- Oven broiler alternative: If you don’t have a torch, place the ramekins on a baking sheet under the broiler. Position them about 5-6 inches from the heat source and watch closely. Caramelization can happen within a minute or two, so don’t step away. Be cautious, as the broiler’s heat may slightly warm the custard.
Make-Ahead Tips and Storage
- Make the custard ahead: Prepare and bake the custard up to 24 hours in advance. Once it has cooled to room temperature, cover each ramekin with plastic wrap or foil and refrigerate. This allows the custard to firm up while maintaining its creamy consistency.
- Caramelize before serving: For the best texture, wait until the last moment to caramelize the sugar topping. If done too early, the sugar may soften and lose its crunchy appeal.
- Storage tips: If you have leftover custards that aren’t caramelized, you can store them in the refrigerator for up to 2 days, tightly covered to prevent absorbing fridge odors. Once the sugar topping is added, the dessert is best enjoyed immediately.
Variations
- Cinnamon: Stir a cinnamon stick into the coconut milk as it warms, allowing its sweet warmth to infuse the base. For even more depth, sprinkle a pinch of ground cinnamon over the caramelized sugar crust for a cozy upgrade.
- Espresso: Dissolve a teaspoon of instant espresso powder into the coconut milk prior to tempering the egg yolks. The bold coffee notes balance the creamy coconut base, creating a dessert that’s perfect for coffee lovers.
- Citrus Zest: Add a teaspoon of grated zest (such as orange, lemon, or lime) to the custard mixture while it’s warming. The brightness of citrus cuts through the richness, offering a light and refreshing twist. As a garnish, a touch of candied peel on top of the caramelized crust ties it all together.
You’ll Also Love: Caramel Custard
Low-Carb and Keto Options
- Sugar Replacements: Use erythritol or monk fruit sweetener instead of granulated sugar in the custard. These sweeteners dissolve well, keeping the custard smooth and sweet without adding carbohydrates.
- Challenges with Caramelization: Most keto sweeteners don’t caramelize like regular sugar (see my Instant Pot Creme Brûlée – it tastes delicious, but looks burnt on top). A workaround is sprinkling allulose or a mix of erythritol and stevia on top. Allulose browns and melts better than other options, creating a reasonable crust. However, achieving the same glossy finish of traditional caramelization may still be a challenge.
DIY Double-Boiler
Apparently I do not own a double-boiler, crazy right? I thought I owned everything you could possibly use in a kitchen. Then I remembered seeing chef’s on TV use a stainless steel bowl, so I gave it a try. It worked perfectly, and I don’t have to store any additional pans!
Please remember that I am not a trained chef. I just get an idea in my head and go for it. Sometimes it works as planned, and other times it does not. If I can make this recipe then trust me, you can too!
Cooking with Astrology – Cancer Meal Recipes
This recipe was originally created as part of a Cooking with Astrology Cancer meal. The meal started with a Shaved Fennel Salad with pineapple, then I served Italian Seafood Pasta for the main course, and Italian Frittata for breakfast.
Our astrological Cancer friends are ruled by the moon, and I thought I would take this opportunity to try out a dairy-free creme brûlée…since it reminds me of the moon. Well okay, maybe it was just an excuse to make one of my favorite dessserts! I don’t think anyone would complain about being forced to eat this for dessert.
Did you try this recipe? I’d love to see it!
Tag @cookingwithcurls on Instagram & Facebook and leave a ⭐️⭐⭐⭐⭐ review below!
Enjoy!!
Dairy-free Crème Brûlée Recipe
Equipment
Ingredients
- 6 large egg yolks
- 7 tablespoons granulated sugar divided
- 1 whole vanilla bean scraped – or 2 teaspoons pure vanilla extract
- 2.5 cups full fat coconut milk shake before using
- berries for garnish optional
Instructions
- Pour the coconut milk into a medium-sized saucepan. Slice open the vanilla bean, scrape out the seeds, and add both the seeds and pod (or vanilla extract, if using) to the milk. Slowly heat the mixture over medium-low heat, stirring occasionally. Keep an eye on it; you want it to steam but never boil.
- In a large mixing bowl, whisk together the egg yolks and 4 tablespoons sugar until the mixture turns pale and creamy. This step is essential to achieving a smooth texture.
- Once the coconut milk is warm, slowly ladle small amounts into the egg mixture while whisking constantly. This tempers the eggs, preventing them from scrambling. Gradually incorporate all the warm milk, creating a smooth custard base.
- Place mixture on top of the pot of boiling water. Reduce heat to simmer, and stir over simmering water until mixture lightly coats the back of a spoon, about 3 to 4 minutes.
- Divide the prepared custard evenly between 4-6 ramekins, leaving a little space at the top. Place ramekins on a silicone-lined baking sheet.
- Bake in preheated 300°F. oven for 30 to 40 minutes. You’ll know the custard is ready when it’s set around the edges but still has a slight jiggle in the center.
- Remove the ramekins from the baking sheet and let them cool to room temperature. Transfer them to the refrigerator for at least 3-4 hours, or overnight if possible. Chilling is key to allowing the custard to firm up properly.
- Once the custard is thoroughly chilled, sprinkle about 1-2 teaspoons of superfine sugar over the surface of each ramekin. Tilt and rotate the ramekin to distribute the sugar evenly.
- Torch the sugar with steady, circular motions until it melts and turns into a golden, glassy crust. The goal is an even caramelization without burning.
- Allow the sugar topping to cool for a minute or two, letting it harden completely.
- Garnish with fresh berries, mint leaves, or a sprinkle of sea salt and serve.
Notes
- Sprinkle 1-2 teaspoons of sugar over each ramekin and tilt it gently to spread the sugar in a thin, even layer. Uneven sugar can lead to inconsistent caramelization.
- No torch? No problem. Place the ramekins under your oven’s broiler, about 5-6 inches away from the heat source. Monitor closely, as the caramelization happens quickly, usually in a minute or two.
- Vanilla Bean Paste: Slice thru the top of the vanilla bean, then use the side of the knife to scrape out the inside.
- You can substitute equal amounts heavy cream for the coconut milk if dairy-free is not needed.
Nutrition
Love this! Definitely going to try this for my husband… we both love creme brulee and try to eat lactose free as much as possible. Pinned it! 🙂
So many things to do with coconut milk. And I think you nailed this one Lisa! I need to learn how to use my blowtorch btw. Creme brulee is one of the best desserts.
Well you had a fabulous idea with this recipe!!! It’s gorgeous Lisa!
Lisa, Creme Brulee is my very favorite dessert, hands down and yours looks fantastic!!! Thanks so much for sharing and pinning – have a happy weekend!!! 🙂
Yummm!…and yes please!
My husband’s fav dessert is creme brulee and I only make a chocolate one, I’ll try this for him, Thanks for sharing at Sat. Dishes! Pinned.
Looks amazing! I bet the coconut milk gives it a great sweet taste. And the consistence looks perfect. Great work.
This sounds delish! I have to try it. Thanks for bringing it over to Saturday Dishes.
Wishes for tasty dishes,
Linda @ Tumbleweed Contessa
This looks absolutely amazing! I love Creme Brulee, it’s become one of my favorite desserts, so I’m really excited to have come across this recipe. It’ll be great to be able to make it for friends and family who are lactose intolerant. Great share!
Ooooh, this looks amazing!
Stopping by from the Sunday Showcase.
Love this idea!!! Definitely trying it 🙂
Ha! My husband has a Benzomatic….I keep telling him “I gunna steal it!” (he has hidden it). I need a torch…I have torch-envy, apparently 🙂
Great job with these being dairy free. I have a family member that ALWAYS stumps me when it comes to desserts. I will remeber this one, for sure!!
This looks great!!! Thanks for sharing at my Sunday Funday Linky Party! 🙂
*Susan
Love the look of this recipe and will certainly try it as I have a friend for lunch and she is Dairy free…excellent. Thank you, have a lovely day <3
This looks wonderful! I hope you will come share at this week’s From the Farm Blog Hop hosted by 6 great blogs!
Lisa
Fresh Eggs Daily
I have yet to try any creme brulee-dairy or dairy free. I have been dying to try it! Thanks for sharing. I actually ended up clicking on both of your recipes at Kathe’s blog hop and am pining both. They look so good!
Creme Brulee is my favorite – but I have never attempted to make it! YUM
Thanks again for linking up to Super Sunday – See you next week!
Holy NOM NOM! That looks divine! Thanks a bunch for the share! Found you via Whimsy Wednesday at the NY Melrose Fam linky!
I have always wanted to make something that I could “torch” I even asked for one for my birthday. I will have to remember this recipe and give it a try! Lovely looking dessert!
Thanks for linking to the In and Out of the Kitchen Link party! So glad you are here!
Delish! I will be sharing this on FB tomorrow! Thanks so much for partying with us this week 🙂
My lactose intolerant husband is going to adore this! What a brilliant idea to use coconut milk. Pinning this now!
You’ve got a blowtorch!!!! I’ve been trying to get a blowtorch for months but always get distracted by other kitchen gadgets lol. Your creme brulee looks FANTASTIC, by the way! 🙂 Yummy and perfectly bruleed!. Thank you so much for linking up with me this week at Tasty Tuesdays! I’ve pinned this & shared it with my followers! Please be sure to stop back by the party and check out some of the other links!
Mmmm… This looks wonderful. I bet the coconut milk is delicious in this recipe! Thank you for sharing at Tuesdays with a Twist! -Marci @ Stone Cottage Adventures
Oh wow! Looks amazing!
This looks so good! I saw your link on a linky party and I just had to click on it! I’ve had creme brulee once in my life and it was divine! I’m stopping by from Tatertots & Jello (#26 Easy & Flavorful Italian Chicken #37 Favorite Crock Pot Recipes) Have a great weekend!
Oh Yum, Crème Brulee is my all time favorite, no exception dessert!!! I will be giving this a try, thank you. I pinned it and I’m sharing on facebook.
Hugs,
Wanda Ann @ Memories by the Mile
This looks yummy! New follower through bloglovin. Thanks for sharing!
I have never had Creme Brulee, but have always wanted to try it! I have also wanted to own and try out one of those torches!
Thank you for linking this to the In and Out of the Kitchen LInk party. I will be sharing it as Big’s favorite in my Top 10 Favorites from the In and Out of the Kitchen Link party.
Thanks for sharing!
I love creme brulee and try to stay away from dairy for health reasons (and am a bit intolerant of straight milk too!) so this recipe is perfect. Can’t wait to try it.
I’ve chosen it as one of my favorites from last week’s Project Inspired party.
Nancy
Coconut milk sounds delicious as a milk substitute in this dish. Can’t get over how authentic it looks. Thanks for sharing your creme brulee on foodie friday.
Mmm! Just seeing that fresh vanilla bean is making my mouth water! Thanks for sharing at Sweet & Savory Saturdays #20!
~Amber @ Dessert Now, Dinner Later!
G’day Lisa, this looks so yum, true!
Dairy free…bonus too; viewing as part of Food Friends Friday Party too!
Cheers! Joanne
My lactose son might even kiss you for this dessert. Pinning.
I’ll take it! He will love this Diane. 🙂
I love creme brulee and yours looks fantastic. I am guessing that this won’t work using a light coconut milk????
No, I don’t think that light coconut milk would work. You need the fat and creaminess to make it all come together and thicken. 🙂
We love creme brulee! I think I’ll have to surprise my husband with this version sometime this week.