Instant Pot Chicken Taco Bowls
This post may contain affiliate links. As an Amazon Associate I earn from qualifying purchases. For more information, please visit my disclosure page.

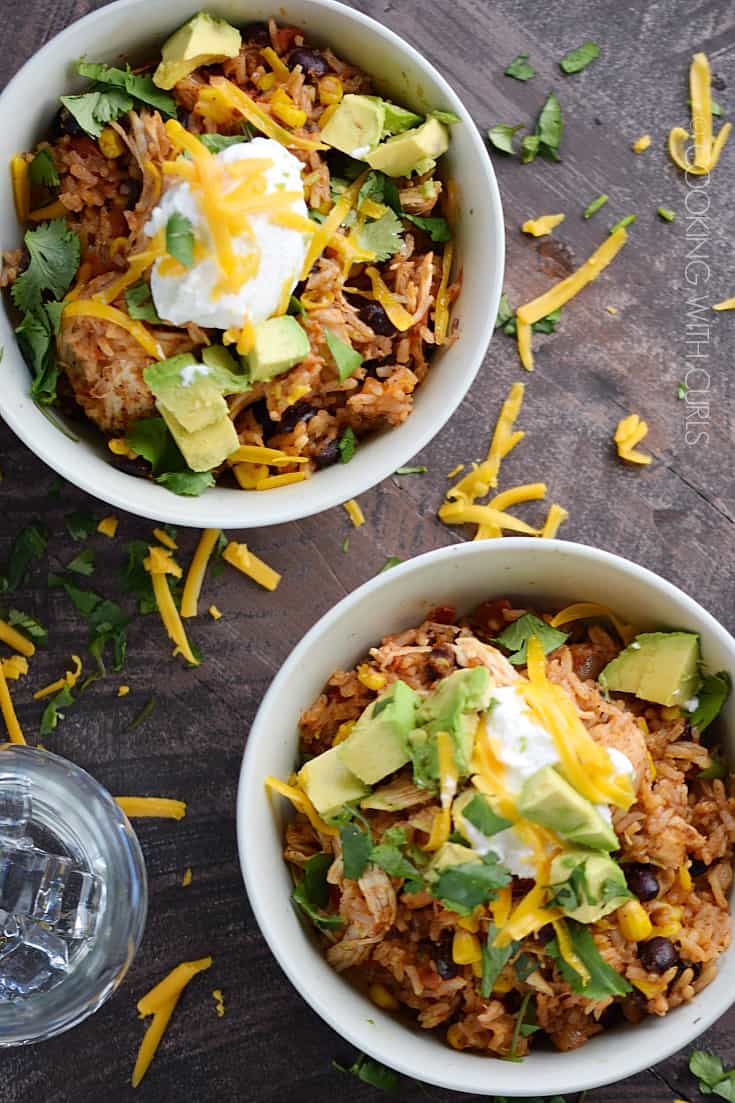
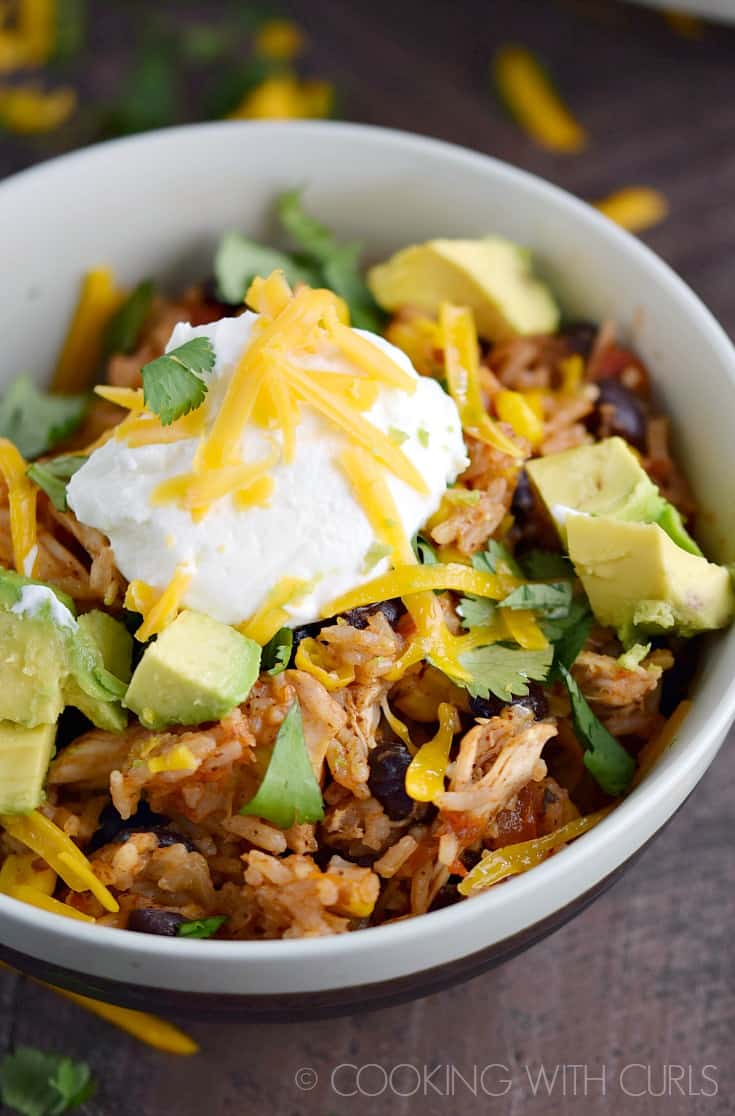
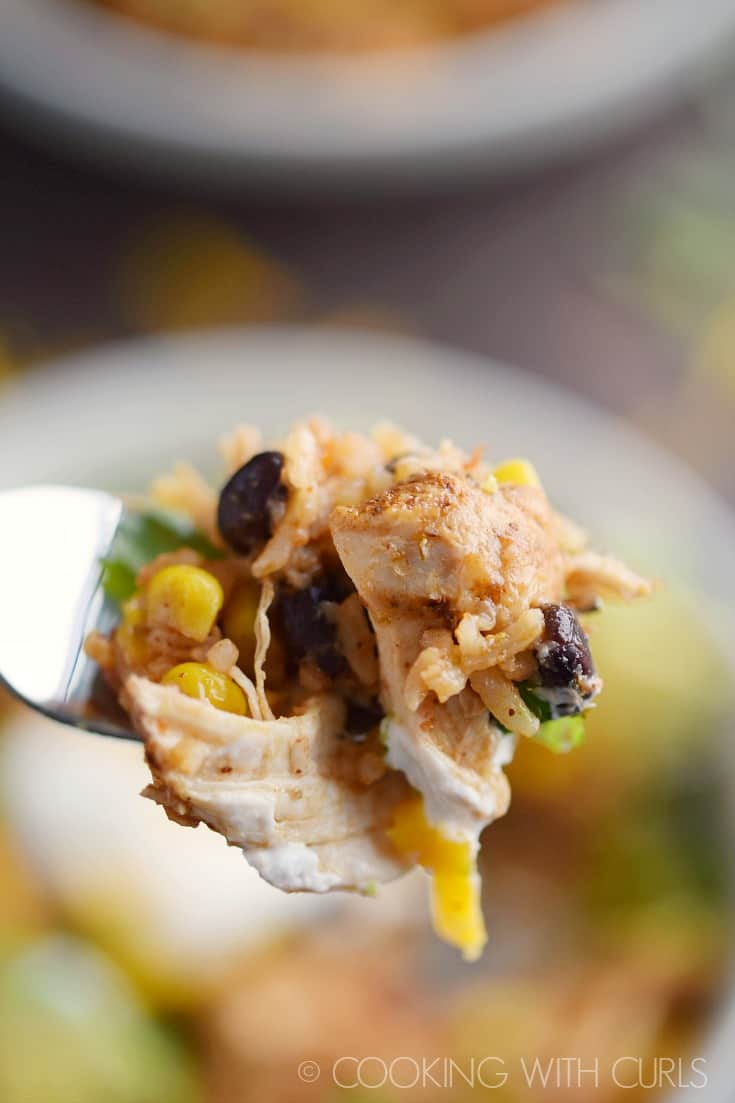
These Instant Pot Chicken Taco Bowls are the perfect solution for busy weeknights, and they’re healthy too!! All of the major food groups are covered, and they are loaded with flavor to keep the whole family happy. I topped mine with Greek yogurt, shredded sharp cheddar, and diced avocado.
For even more delicious pressure cooker recipes, check out the Instant Pot Recipes page.
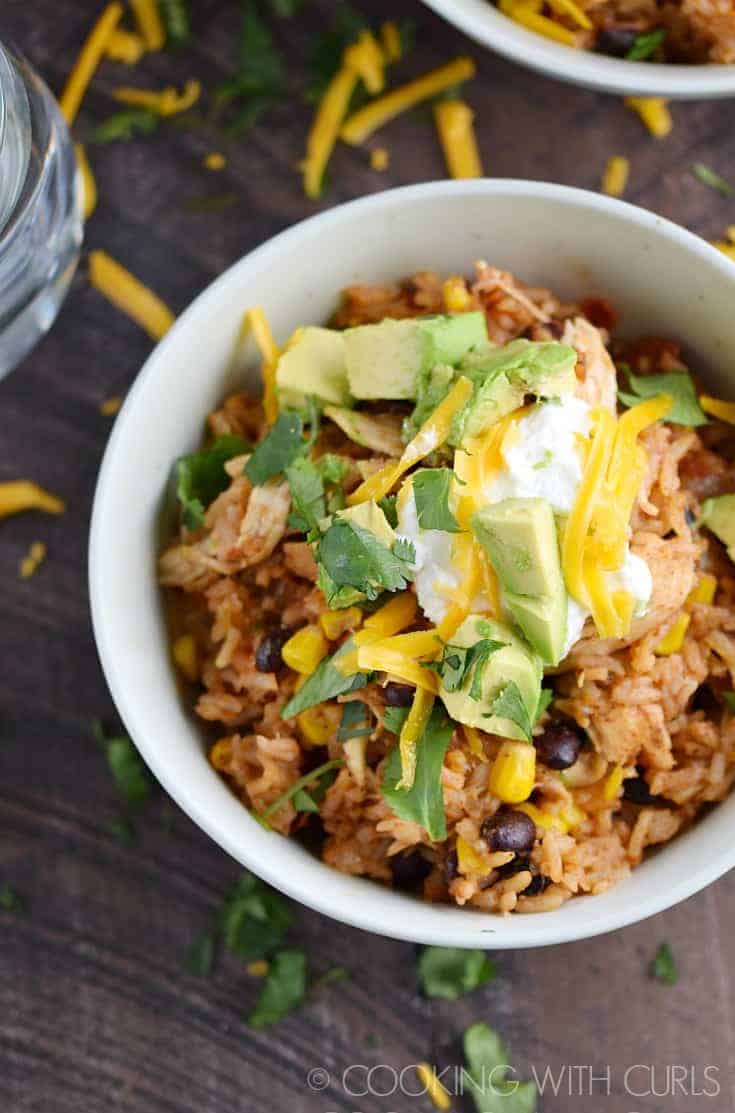
For even more heat top your Chicken Taco Bowls with sliced jalapenos. Add some diced, fresh tomatoes, shredded lettuce, and tortilla chips for some added crunch!
How do you make Instant Pot Chicken Taco Bowls?
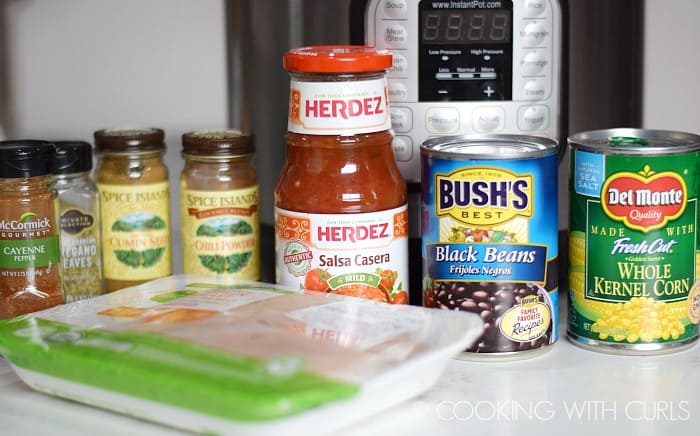
To keep this meal nice and easy, I have tried to use ingredients that are widely available…..
For added spiciness, choose a medium or spicy salsa and add additional cayenne pepper!
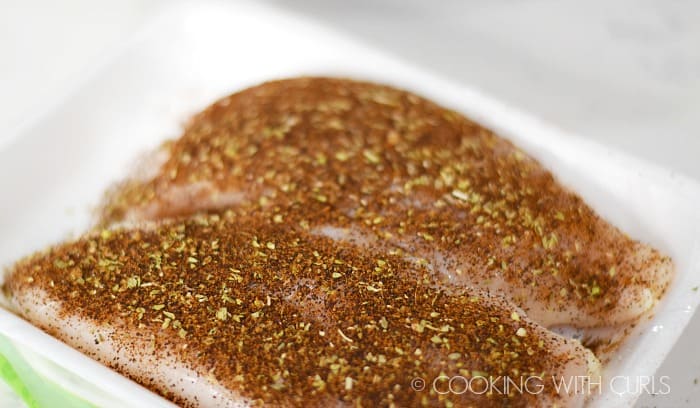
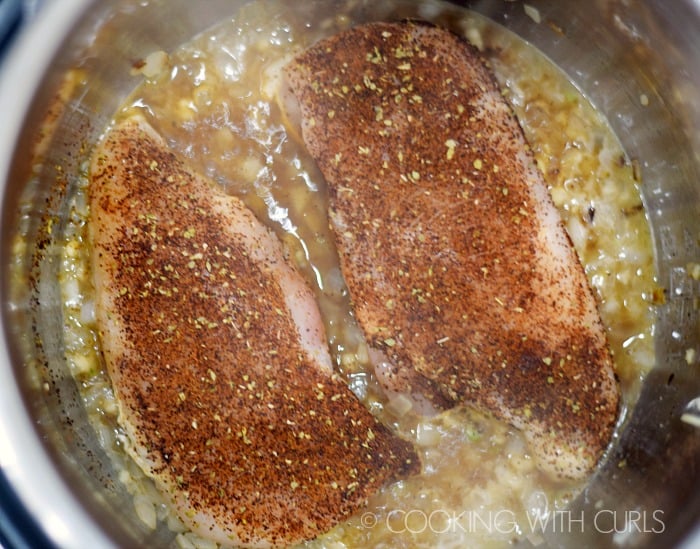
Mix the chili powder, cumin, oregano, salt, pepper, and cayenne together in a small bowl. Sprinkle both sides of the chicken breasts with with the seasoning mixture, set aside.
***This recipe was made using a 6-Quart IP Duo Instant Pot – if you have an 8 quart or an Instant Pot that is less than 2 years old I highly suggest that you saute in a separate pan on the stove, or skip that step altogether! The newer versions are much more temperamental and causing a lot of BURN notices. Also, check your manual to find the instructions for cooking rice and make sure you follow the amount of liquid/rice ratio for your particular pressure cooker.***
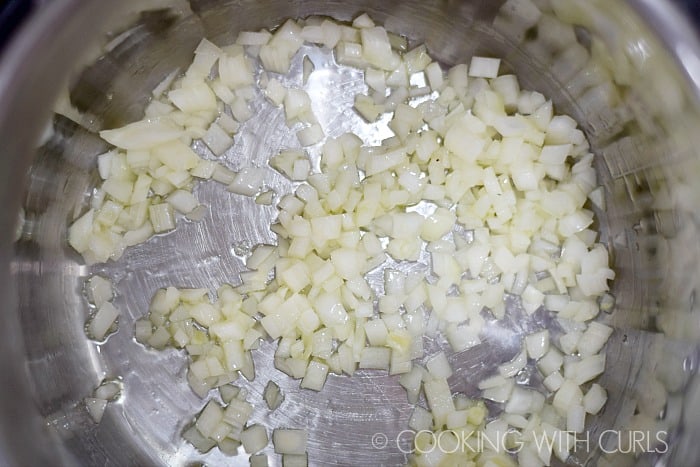
Plug in your pressure cooker and press the “Saute” button. Add the olive oil to the liner when the display reads “HOT”. Add the onions and cook until they start to soften, about 3 minutes.
Add the garlic, stir and cook for one minute. Press the “Cancel” button and pour in the chicken stock. Scrape the bottom of the liner to remove any browned bits.
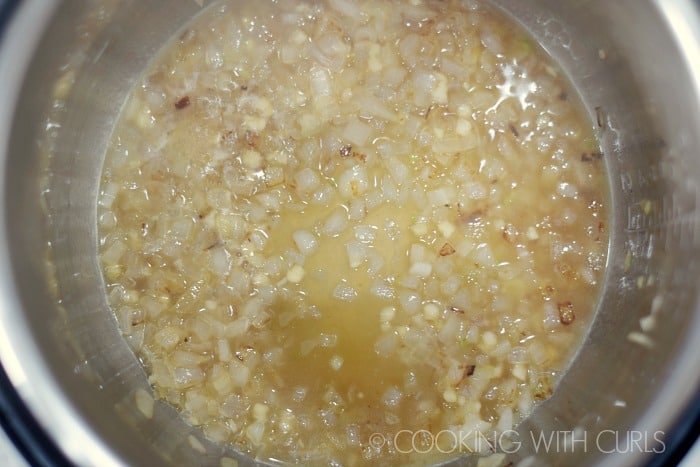
aka, deglaze the pan. 😉
Place the chicken breasts in the pot.
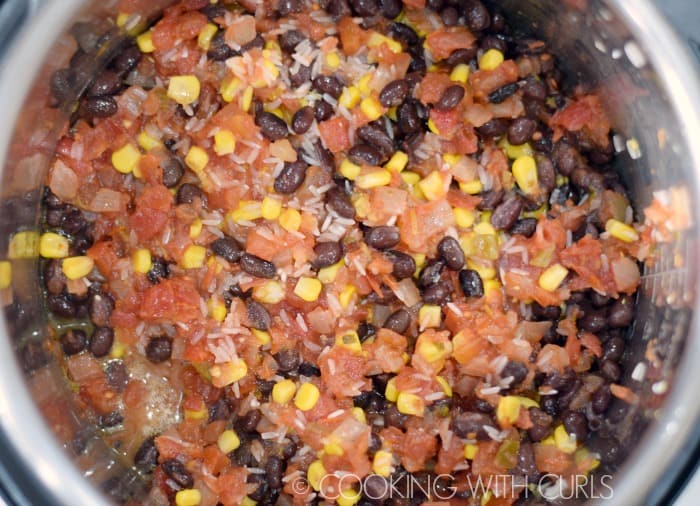
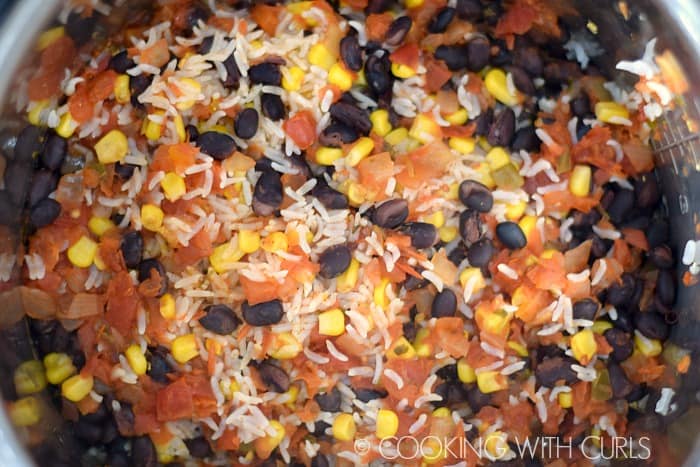
Add the rice, salsa, black beans, and then the corn.
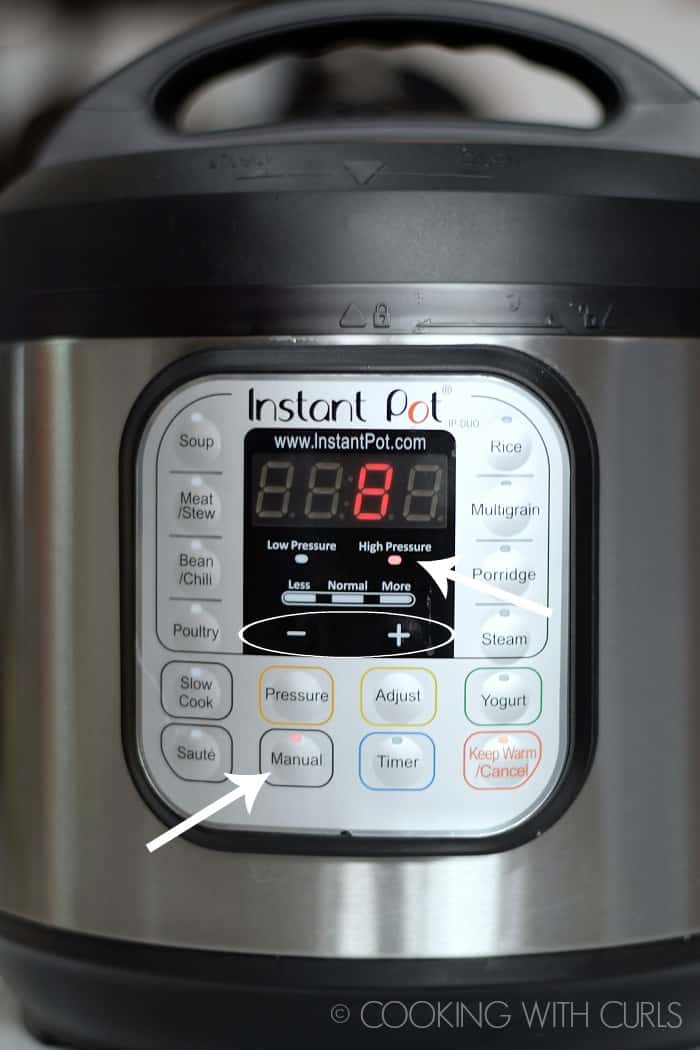
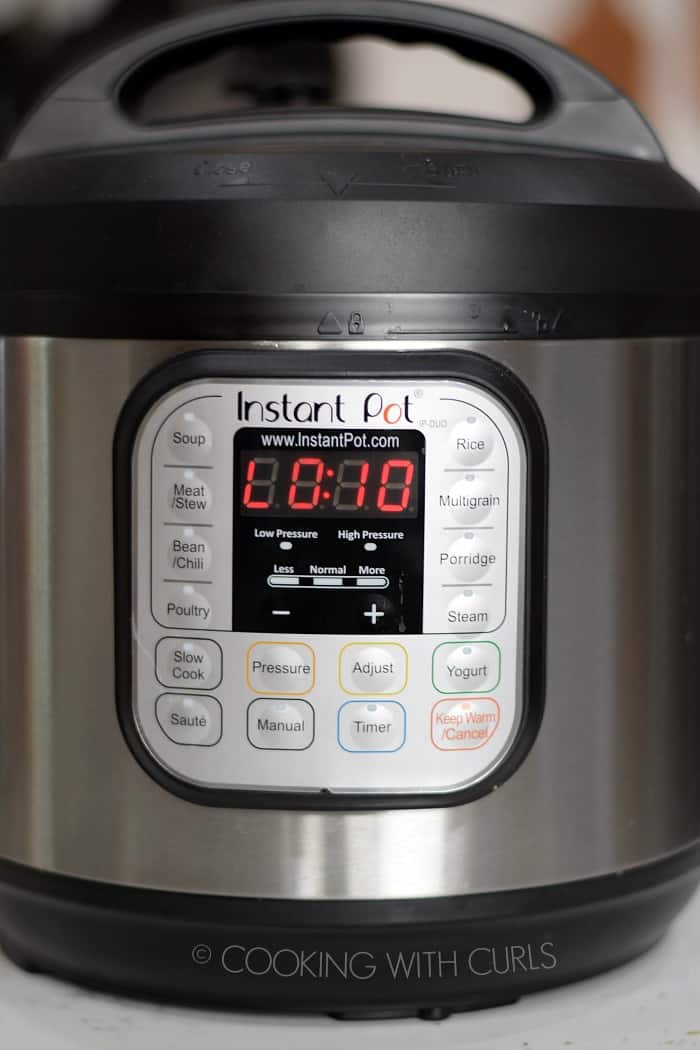
Seal the lid and check to make sure the knob is in the “Sealing” position. Press the “Manual” button, check to make sure it is High Pressure, and adjust the time to 8 minutes using the + or – buttons.
When the pressure cooker beeps, allow the pressure to release naturally for 10 minutes.
Turn the knob to manually release any remaining pressure.
Remove the chicken breasts and shred them using two forks.
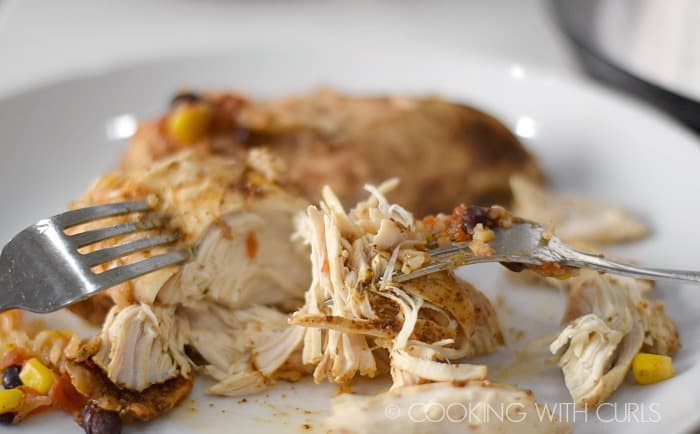
Return the shredded chicken to the pot and stir to combine.
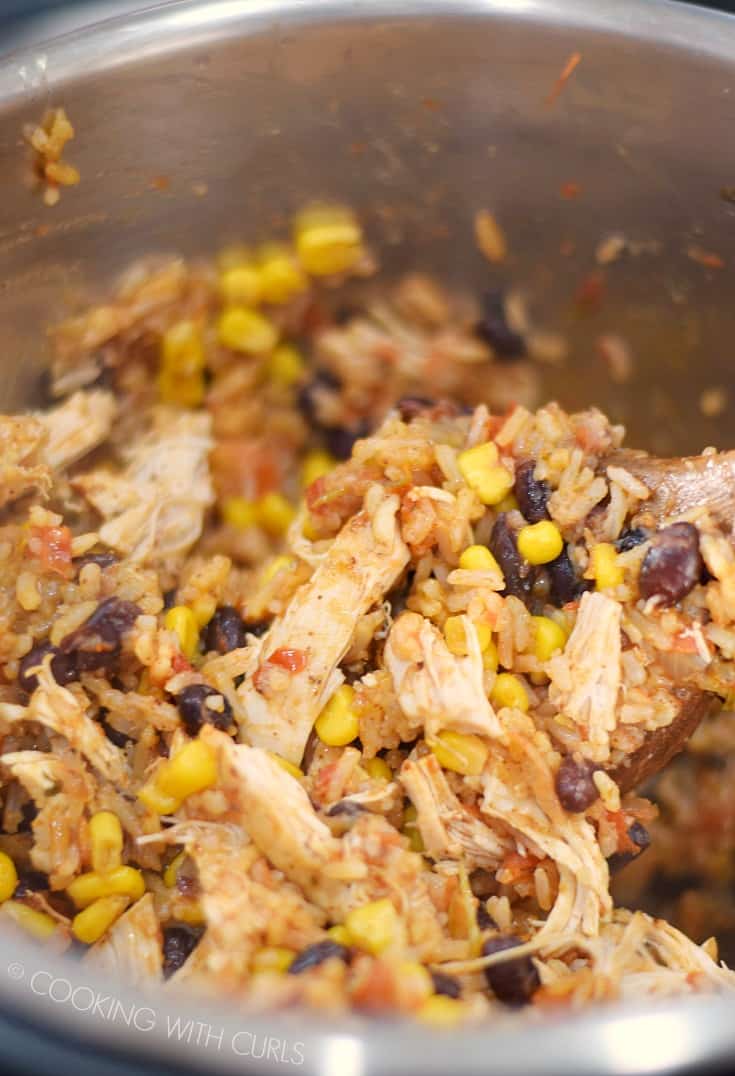
Stir in the cilantro and serve topped with your favorite taco toppings.
and a big fork, so you can get a big bite!! LOL
Ten minutes to prep, about 30 minutes to cook, and dinner is on the table!
Recipe Notes & Tips:
- I served mine in a bowl, but it would also make an amazing filling for burritos and actual tacos.
- I use this 6 quart IP Duo Instant Pot for all of my recipes. {affiliate link}.
- Feel free to substitute sour cream for the Greek yogurt and your favorite cheese. I need to keep mine lactose-free!
More delicious Instant Pot meals for you to try:
- Instant Pot Mexican Casserole
- Mexican Style Shredded Beef
- Instant Pot Bacon Cheeseburger Meatloaf
- Instant Pot Italian Beef
- Instant Pot Kalua Pork
So many yummy choices…Enjoy!!
Chicken Taco Bowls UPDATE:
There seems to be a less than perfect success rate with this recipe so I am trying to come up with solutions to get it to 100% success rate!!
I remade this recipe last night trying to figure out exactly what steps I was taking that could be done differently by different people. Burn notices and crunchy rice mean you need more liquid…but why are we all getting different results?
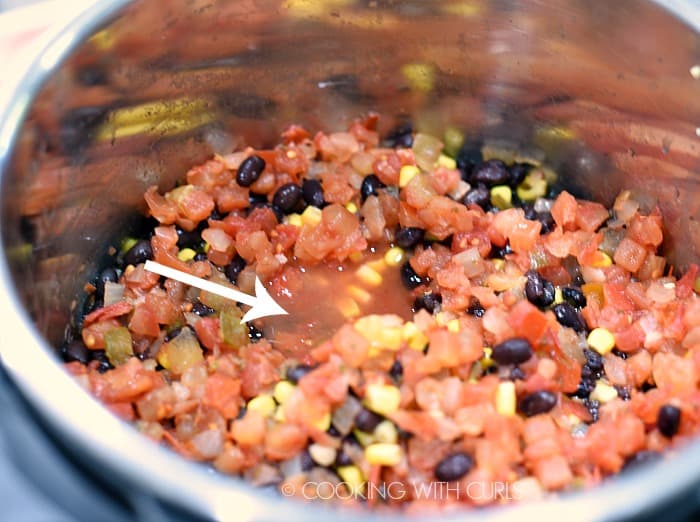
Do you see the amount of liquid in the above image, that is how much YOU should have at home. I simply moved the beans, corn, and salsa to the side to make a hole.
If you do not see any liquid floating above the rice, add more chicken stock.
So let’s go step-by-step:
- Rice: I rinse the rice with a strainer until it runs clear. I shake it to remove the excess water so it won’t spill on the floor and dump it into the pot. I use a wooden spoon or spatula to even out the rice.
- Beans: I do the same as with the rice, rinse, shake, dump, and even it out.
- Corn: Same thing, rinse, shake, dump, spread.
- Salsa: I use Herdez every single time I make this recipe. If you are using Pace or another “thick” salsa you will not have enough liquid!!
- To be safe, you could add the salsa on top of the rice and then add the beans and corn last.
I am very sorry if this recipe did not work for you, but I have NEVER received a BURN notice making any recipe using either of my Instant Pots….EVER!! If I had, I never would have posted the recipe. Nasty, vulgar emails and comments are completely uncalled for and not helpful to finding a solution.
I hope this helps!

Instant Pot Chicken Taco Bowls
Ingredients
Taco Seasoning Mix
- 3 teaspoons chili powder
- .5 teaspoon ground cumin
- .5 teaspoon dried oregano
- .125 teaspoon cayenne pepper or more to add more heat
- .25 teaspoon sea salt
- .25 teaspoon black pepper
- 1.25 pounds boneless, skinless chicken breasts
- 1 tablespoon olive oil
- 1 cup diced, yellow onion
- 2 cloves fresh garlic, minced
- 1 cup chicken stock (I am now recommending 1 cup to be safe, especially if you have a newer model)
- 1.25 cup long-grain, white rice rinsed and drained
- 15.25 ounce can whole kernel corn rinsed and drained
- 15 ounce can black beans rinsed and drained
- 16 ounce jar tomato salsa (a thin, watery type salsa not chunky style)
- ½ cup chopped cilantro
- toppings of your choice
Instructions
- Mix the chili powder, cumin, oregano, salt, pepper, and cayenne together in a small bowl. Sprinkle both sides of the chicken breasts with with the seasoning mixture, set aside.
***This recipe was made using a 6-Quart IP Duo Instant Pot – if you have an 8 quart or an Instant Pot that was made after 2018, I highly suggest that you sauté in a separate pan on the stove, or skip that step altogether! The newer versions are much more temperamental and causing a lot of BURN notices. Also, check your manual to find the instructions for cooking rice and make sure you follow the amount of liquid/rice ratio for your particular pressure cooker.***
- Plug in your pressure cooker and press the “Saute” button. Add the olive oil to the liner when the display reads “HOT”. Add the onions and cook until they start to soften, about 3 minutes.
- Add the garlic, stir and cook for one minute. Pour in the chicken stock and press the “Cancel” button. Scrape the bottom of the liner to remove any browned bits.
- Place the chicken breasts in the pot. Add the rice, salsa, black beans, and then the corn.
- Seal the lid and check to make sure the knob is in the “Sealing” position. Press the “Manual” button, check to make sure it is High Pressure, and adjust the time to 8 minutes using the + and – buttons.
- When the pressure cooker beeps, allow the pressure to release naturally for 10 minutes. Turn the knob to manually release any remaining pressure.
- Remove the chicken breasts and shred them using two forks. Return the shredded chicken to the pot and stir to combine.
- Stir in the cilantro and serve topped with your favorite taco toppings.
Notes
- I served mine in a bowl, but it would also make an amazing filling for burritos and actual tacos.
- I use this 6 quart Instant Pot for all of my recipes. {affiliate link}.
- Feel free to substitute sour cream for the Greek yogurt and your favorite cheese. I need to keep mine lactose-free!
- Allow additional time for the pressure cooker to come up to pressure, 10 to 15 minutes.
- Not everyone will use cheese, avocado, and/or the Greek yogurt, so they have not been calculated in the nutritional information.
- My only other recommendation to improve results would be to use 1 cup of chicken stock instead of the original 3/4 cup to guarantee that you have more liquid. This may lead to stickier rice, but it might lessen your chances of receiving a burn notice.


Beautiful photos Lisa! This recipe will really hit the spot with my two grandsons. I read thru the instructions and the recipe twice, but couldn’t find how much chicken stock needs to be added to deglaze the pan. Thanks in advance for the clarification!
Oops, it is 3/4 cup of chicken stock Marilyn. Sorry about that!
How much chicken stock do I use?
3/4 cup
Have you ever doubled this recipe in the 6 quart? Would it work ok?
No I have not Heather. In theory it should work, just be extra careful with your amount of liquid!! Please come back and let me know how it went if you try it, I would love to know! 🙂
How much chicken stock do you use? The recipe doesn’t say.
Sorry about that Ashley, it’s 3/4 cup.
How much stock do you use? I don’t see it listed….
3/4 cup Marie
Uh oh… I’m in the middle of making this and can’t find how much chicken stock it calls for! Help?
Sorry about that Taleni, 3/4 cup.
Can you make this without the rice? Any adjustments you would suggest?
I have made it with the rice and it’s amazing! Just trying to see if I could cut some carbs.
Thanks!
This recipe was amazing! Thank you for sharing, it’s going to be one of my go tos from now on. I can’t believe how delicious it turned out =D
Thank you so much,Paige. I am so glad you enjoyed it!
Hey Lisa I just got a instant pot for a wedding present so I wanted to try out your recipe. Does the rice need to be cooked before adding to the pot?
Congratulations Corey! No, you just rinse and drain the rice and toss it right in. It doesn’t need to be completely dry, you need some of the moisture from the water for the recipe. 🙂
Any changes on Cook time if using brown rice?
That would not recommend using brown rice for this recipe, Ray. Brown rice needs 22 minutes too cook with 15 to 20 minutes to release the pressure, by then the chicken and vegetables would be mush.
Burnt my Instantpot. Yes, I deglazed. No, I didn’t stir the ingredients. Had to throw the whole meal away.
Then you did not have enough liquid. There are images showing exactly how much liquid you should have, I don’t know what else I can do to explain this recipe.
Fixed in my 6 quart instant pot. I didn’t have long grain rice, used what I had. Followed the recipe completely, but left a bit of liquid from the black beans and corn. Made sure the rice was completely in the broth. Came out perfectly, delicious, and will make again. Thanks!
That is awesome, Kathleen!!! Thank you so much for letting me know that it worked for you. 🙂
I used this recipe to test out my new Instant Pot. So first recipe ever in it! Perfect one to do. We ate it with chopped avocado, Greek yogurt, and shredded cheese. Will share the recipe with my friends. Thank you.
Wow you are daring Kimberly, I am so glad it worked for you!! Thank you so much for letting me know! 🙂
Haven’t yet made this as I just received my Instant Pot for my birthday yesterday. What if I forget to thaw out my chicken (the reason my kids got me the pot in the first place) Does anything change in the recipe?
You can use frozen chicken Jayn, it just takes longer for the Instant Pot to come up to pressure. 🙂
First time instant pot user here….so does this mean I follow the recipe the same way if using frozen chicken? The instant pot will just take longer to come to pressure but it will still work? This looks delicious can’t wait to try it!
Yes, that is my understanding Amy but I have never tried it myself. Please let us know how it turns out! 🙂
My Instapot did not have a manual button. Just used the pressure cook button. Would that be ok?? First timer here.
Yes Alli, both buttons work the same way. I have no idea why they decided to change the name on the newer IPs. 🙂
I’ve heard that the newer Instant Pots heat up to a higher temperature. Perhaps the recipe’s success depends on the model you’re using? Another thing I’ve seen other people say is that the inner pot can become too hot after sautéing. They suggested that you let the pot cool down completely after sautéing before continuing on with the recipe. Not sure if this helps, but thought I’d put the idea out there.
I got the burn message as well (I’m using the Instant Pot Viva 9-in-1 model), what I ended up doing was cancelling the pressure cook and finished cooking the dish using the sauté function while stirring frequently instead. The dish tasted perfectly fine. It’s just that I had to cook it in an unexpected way ^_^
I have heard this as well Ali, which is really stupid on Instant Pot’s part. Both of my Instant Pots are over 2 years old and I have never gotten a burn notice!! That is a good idea about the sauteing, I may add that to the recipe as an option. Thanks so much for your input, and I’m sorry it didn’t work out as planned.
All mine did was burn to the bottom of the pot. I had to remove everything and deglaze about 6 or 7 times. I did everything in your tips and it still burnt. I added more broth in the beginning (I used veggie because that’s what I had and I probably added about 1 1/2-2 cups of broth to start) and I kept adding more and more liquid every time I had to stop it and it still burnt. The food still cooked (we didn’t eat until 9pm though), but it was definitely a lot more liquidy than your pictures. It was my first time using my instant pot, so it was somewhat disheartening.
The only things I can think of is that mine is an 8 qt, and/or maybe I didn’t rinse the rice enough (which I’ve never rinsed my rice in my life, so that was new to me XD), or it might have been my salsa (since I’m in Canada, I’ve never heard of that brand but I used a regionally-made salsa that I know has more liquid, mixed with about 5 or 6 oz of Old El Paso, which put me at about 18 oz because I didn’t want to leave a tiny bit in the jar). So I don’t know what happened.
Wow you are brave Ashley, trying this recipe for your first time!! I have heard rumors that the 8 quart and the newer 6 quart models cook hotter than the earlier versions. The brand of salsa should not matter, it all about the amount of liquid. Rinsing the rice removes the excess starch, so in theory it will stay separated and not turn gummy. It sounds like you did everything right, Ashley, there just seems to be some huge discrepancies between different Instant Pots. 🙁
I tried this a few times, always came out too soggy. Any suggestions? Only thing I can think of is using fresh/bulk beans instead of canned? That way it soaks up some of the water? Somehow I’m having the opposite issue as everyone else
Hmmm, too soggy would be too much liquid which is definitely different than everyone else. I have never tried it with fresh beans so I’m not exactly sure how that effect the outcome. I do know that with my older Instant Pot my is mushy if I use a full cup of stock, but never soggy. Okay this one has me stumped!! I would try less stock and see what happens. Fingers crossed!!! 🙂
I’ve made this 3 times now. The first time I followed the recipe as above and I had to add an additional 3 minutes to the cook time. It gave me a burn error although it was perfectly edible. So the next 2 times I added 1/4 cup extra stock, so 1 1/4 C total and 3 additional minutes of cook time and it turns out perfect. About to make it a fourth time as soon as I put down the phone!
Any suggestions with 3 quart mini? Dying to try this!
This is new favorite in our home! So tasty, great in a wrap to mix it up a bit! Awesome recipe, thank you for sharing!
Ii made this tonight. Very good. I’ll probably add a bit more cayenne pepper next time. I did add a bit more broth, maybe a 1/4 cup. I had sour cream, chopped olives, chopped green onions and shredded cheese for toppings. I also used Old El Paso soft tortilla bowls to serve it in.
I do have a question. The recipe states six servings. How big are your servings because I got much more than six. I probably got 15 at about a cup and a half.
Oh my goodness so good! And thanks so much for all the notations and potential adjustments that might have been needed! I made this recipe last month as my FIRST ever instant pot recipe and I got the “burn” message some have talked about. Honestly I just kept adding liquid (water or chicken stock) as needed and it came out very tasty. I didn’t have to throw anything out. Anyway we liked the flavors so much that I decided to try the recipe again since I have a bit more experience. IT IS PERFECT!! I used one cup and next time will try 3/4 cups since I did just what you said for the rice, beans and corn (which added a small amount of liquid). THANK YOU for sharing this recipe!!!!
I have been making this recipe almost once a week for about a year. It’s awesome! My family loves it! Never got a burn notice. People should be nice. Thank you for sharing this recipe!
Thank you so much Kristin! I am really happy that your family loves it as much as we do. 🙂
This was my very first instant pot recipe! I’m not sure what I did wrong, but experienced the “burn” message like so many others. I just added more chicken broth and water and it came out delicious. We liked the flavors so much that I tried the recipe again and my second attempt was PERFECT! I followed the instruction exactly as written. Your notes were super helpful throughout. I probably didn’t need that extra half cup of broth that you mentioned so next time I’ll try your original ingredients. THANK YOU for a great recipe!
My family loves this recipe! We’ve had it in bowls, in burritos, and as nachos. I have made it several times in an 8 quart instant pot. One cup of stock works well, and I’ve never had a burn notice. If it is slightly soggy, I saute to cook off the excess liquid after shredding the chicken, stirring carefully to keep it from burning. Thank you for sharing thus recipe! I appreciate your step-by-step pictures and your updates.
I absolutely LOVE this recipe!!! I make it regularly in our home!! I always make it according to the recipe, but this time I’ll be using chicken from a whole chicken I already cooked. Would I leave the chicken out and lessen the cooking time? Or should I still include the chicken, but still lessen the cooking time? I don’t want the chicken to come out too tough. I don’t usually alter recipes, but this one time I have to make an exception!! Haha!! Any insight would be helpful! I’m still learning how to adjust recipes with my Instant Pot. Thank you so much! And thank you for this amazing recipe that is a huge hit in our home!!